- All products are added to your cart.
Instructions on how to select the right settings on your printer.
In order to be able to use the materials on this website optimally, you must provide the printer with the correct settings before printing.
Not everyone knows exactly how this should be done, which is why I write this short guideline on how and where the printer settings can be found.
Please note! This is a general guideline, depending on the printer brand / type and version of the operating system, the screens and available options may differ.
In this article I only use the printers and operating systems that are available to me.
My apologies up front for the screenshots, they are all in dutch so i think it is wise to follow the guiding text instead.
For windows:
Open the document or image you wish to print.
Then go to "File> Print" to open the "Print" window.

At the top of this window, select the printer you want to use for printing.
Then, on the right-hand side, under the "select printer" box, click "Preferences".
This opens the "Preferences" window of the previously selected printer.
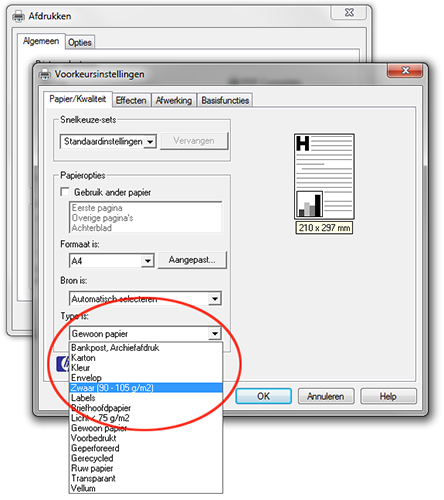

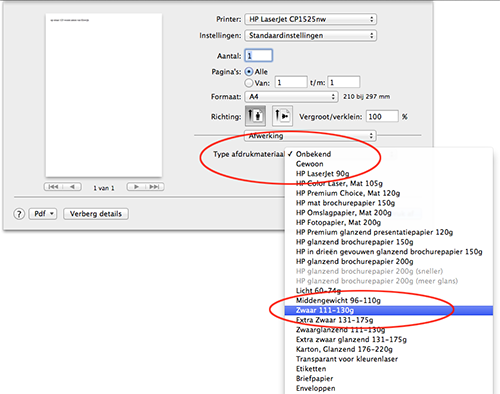
In this window, look for the option like or similar to: Type of paper, Medium type, paper type.
As you can see in the images above, this option is available for every printer in a different location.
The first image is from an HP laserjet monochrome printer, the second is from a Canon Pixma photo printer.
What you need to indicate with this setting depends on the material used and can be found in the supplied manual of that material.
Finally, depending on the type of material you want to print and the printer you are using, you can also set the print quality.
In the case of the Canon printer (right), this setting is directly below the "Media Type" selection menu, the HP laser printer has no such setting.
Often you can find the quality setting under the name Quality setting, Print quality or resolution.
These are the most important settings, then click "OK" to confirm your settings and then "Print" to make the print.
Please Note! When you close these windows to make a change to your document, in most cases you have to change these settings again as described above.
For Mac:
Open the document or image you wish to print.
Then go to "File> Print" to open the window for the printer settings.

Select at the top of this screen at "Printer" the printer with which you want to print.

Then click where in this example safari is, to open a selection menu with printer settings.
In this menu, look for an option such as: "Finishing, Print setting, Printer setting, Paper type / Quality" these options vary per printer.
This opens the settings for the quality and paper type selection.
Then select the option similar to "Print media, paper type, media type or paper setting".
Then you can set the type of paper you need to use to make your print.
What you need to indicate with this setting depends on the material used and can be found in the supplied manual of that material.
Finally, depending on the type of material you want to print and the printer you are using, you can also set the print quality.
Often you will find the quality setting under the name Quality setting, Print quality or resolution and in the same window as the selection for paper type.
These are the most important settings, then click on "Print" to make the print.
Pay attention! When you close this window to make a change to your document, in most cases you have to change these settings again as described above
As a mac user, you can easily save the changes made above for later use by opening the selection menu at the top of the print setting window below the printer selection at "settings".
Then go to "Save current settings as a preset" after which you can give this setting a name and save it for all printers or only the current printer.
When you print with the same settings repeatedly this allows you to just select this preset and then the above selected settings are immediately set correctly.